RTSP Streaming
Qualcomm Dragonwing™ RB3 Gen 2 RTSP Camera Streaming with Qualcomm Linux 1.3 AI Sample Application Demo on Qualcomm Device Cloud
How to do RTSP camera streaming on the Qualcomm Dragonwing™ RB3 Gen 2 devices?
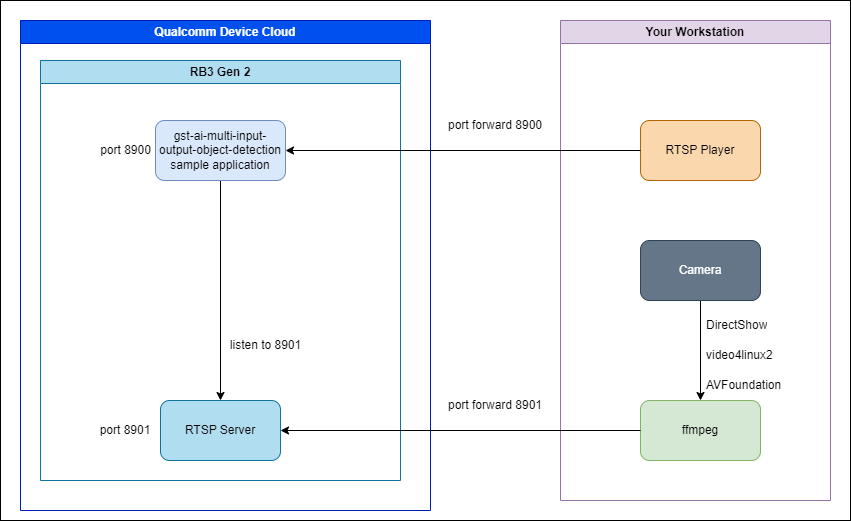
The Qualcomm Linux AI sample applications can take camera, file, and RTSP stream input sources and outputs. Since you will be using a remote RB3 Gen 2 in Qualcomm Device Cloud, RTSP camera streaming will allow you to stream a live camera input from your local machine (e.g. a webcam, attached USB camera, or local network RTSP server) and output to a RTSP camera stream for playback on your local machine.
Prerequisites
- RB3 Gen 2 device with Qualcomm Linux 1.6 and QIMSDK
- Multi-input AI inferencing AI sample application (included in the QIMSDK)
- FFmpeg: For capturing attached cameras into an output RTSP stream.
- Camera capture: Windows DirectShow, video4linux2, and OS X AVFoundation
- The OS specific ffmpeg documentation also provides commands to find the camera name and pixel format depending on the camera hardware.
- mediamtx: A simple RTSP server for proxying the local machine camera stream.
- Download the Linux ARM64 V8 release.
Instructions
-
Start a QDC Interactive Session with a RB3 Gen 2 device.
- Upload or choose an existing SSH public key for the interactive session to enable SSHing to the RB3 Gen 2 device.
-
In the running interactive session, click on the Connect button to view the SSH instructions to connect to the device.
- The additional ports mentioned in the last section of the instructions will be needed for RTSP camera streaming.
- Connect to the RB3 Gen 2 device with SSH. For example:
# Port 5037 is the ADB server # Port 8900 will be used for the mediamtx RTSP server # Port 8901 will be used by the GStreamer RTSP server # Port 22 is the RB3 Gen 2's SSH server which will be reached via localhost port 2222 ssh -i <PRIVATE_KEY_FILE_PATH> -L 5037:sa<session>.sa.svc.cluster.local:5037 -L 2222:sa<session>.sa.svc.cluster.local:22 -L 8900:sa<session>.sa.svc.cluster.local:8900 -L 8901:sa<session>.sa.svc.cluster.local:8901 -N sshtunnel@ssh.qdc.qualcomm.com -
Check if you can SSH to the device. Alternatively, you may use
adb shellandadb pushif preferred.sshandscphas replacedadbin the Qualcomm Linux 1.3 documentation.ssh -i <PRIVATE_KEY_FILE_PATH> -p 2222 -o StrictHostKeychecking=no -o UserKnownHostsFile=/dev/null root@localhost -
Copy the mediamtx tarball file downloaded from the prerequisites section to the device:
# e.g. mediamtx_v1.11.3_linux_arm64v8.tar.gz
scp -i <PRIVATE_KEY_FILE_PATH> -P 2222 -o StrictHostKeychecking=no -o UserKnownHostsFile=/dev/null <local_file_location>/mediamtx_<version>_linux_arm64v8.tar.gz root@localhost:/opt/mediamtx.tar.gz
Run the following in
ssh:# In an ssh session cd /opt tar -xf /opt/mediamtx.tar.gzEdit the mediamtx.yml file so the RTSP server port is one of the opened output ports you will be using (i.e. 8900-8909):
# In an ssh session
vi /opt/mediamtx.yml
mediamtx.yml snippet example:
###############################################
# Global settings -> RTSP server

# Enable publishing and reading streams with the RTSP protocol.
rtsp: yes
# List of enabled RTSP transport protocols.

...

# Address of the TCP/RTSP listener. This is needed only when encryption is "no"
rtspAddress: :8554
Change the
rtspAddress: :8554portion:# Address of the TCP/RTSP listener. This is needed only when encryption is "no" rtspAddress: :8901Alternatively, you can edit the file on your local machine before pushing to the RB3 Gen 2 device.
-
Export and push your YOLOv5 model generated from the Qualcomm Intelligent Multimedia Software Development Kit documentation for the Multi-input AI inferencing sample application.
scp -i <PRIVATE_KEY_FILE_PATH> -P 2222 -o StrictHostKeychecking=no -o UserKnownHostsFile=/dev/null yolov5.labels root@localhost:/opt/yolov5.labels scp -i <PRIVATE_KEY_FILE_PATH> -P 2222 -o StrictHostKeychecking=no -o UserKnownHostsFile=/dev/null yolov5.tflite root@localhost:/opt/yolov5.tflite -
Start the mediamtx RTSP server on the RB3 Gen 2.
# Run in an ssh session cd /opt ./mediamtx -
Use FFmpeg to send a local RTSP camera stream to the mediamtx RTSP server. See prerequisites for details for running FFmpeg camera capture on other operating systems. For example, on a Windows laptop with a webcam named "Integrated Camera":
ffmpeg -f dshow -video_size 640x480 -pixel_format yuyv422 -i video="Integrated Camera" -framerate 15 -tune zerolatency -vf format=yuv420p -c:v h264 -crf 10 -f rtsp -muxdelay 0 -rtsp_transport tcp rtsp://127.0.0.1:8901/mystream/live1.mkvSee prerequisites for details for running FFmpeg camera capture on other operating systems or how to list available camera sources. Note: The "live1.mkv" part of the URL is expected from the gst-ai-multi-input-output-object-detection sample application.
-
Create the weston.ini config file and run Weston.
# Start a new ssh session
mkdir -p /etc/xdg/weston
touch /etc/xdg/weston
vi /etc/xdg/weston/weston.ini
Paste the following options into weston.ini to allow Weston to run without an output display.
# configuration file for Weston
[core]
idle-time=0
backend=drm-backend.so
repaint-window=10
gbm-format=xbgr8888
require-outputs=none

[output]
name=DSI-1
mode=on

[output]
name=DP-1
mode=on

[shell]
clock-format=seconds
Now run Weston as indicated in the Qualcomm Linux documentation:
export GBM_BACKEND=msm && export XDG_RUNTIME_DIR=/dev/socket/weston && mkdir -p $XDG_RUNTIME_DIR && weston --continue-without-input --idle-time=0 -
Edit the configuration for the GStreamer AI multi input output object detection sample application. You can modify the default location at
/etc/configs/config-multi-input-output-object-detection.json{ "input-rtsp-path": ["rtsp://127.0.0.1:8901/mystream/live1.mkv"], "model": "/etc/models/yolov5.tflite", "labels": "/etc/labels/yolov5.json", "output-ip-address": "127.0.0.1", "output-port-number": "8900", "output-display": false } -
Start the GStreamer AI multi input output object detection sample application with the instructions from the Qualcomm Linux AI sample application documentation.
# Start a new ssh session # Setup some environment variables in the SSH session for display export XDG_RUNTIME_DIR=/dev/socket/weston && export WAYLAND_DISPLAY=wayland-1 # Run the GStreamer AI multi input output object detection sample application gst-ai-multi-input-output-object-detection --config-file=/etc/configs/config-multi-input-output-object-detection.json -
(Option A) Playback the output stream on local machine with FFplay (part of FFmpeg):
ffplay -probesize 32 -analyzeduration 0 -sync ext -fflags nobuffer -flags low_delay -x 640 -y 480 -rtsp_transport tcp rtsp://127.0.0.1:8900/liveAlternatively, use a video player like VLC that can play RTSP streams from over the network.
-
(Option B) Get the output from the "display" through Remote Desktop.
Create the RDP server key and certificate.
openssl req -x509 -nodes -days 365 -newkey rsa:2048 -keyout /opt/server.key -out /opt/server.crtStop Weston and edit the weston.ini config file again.
# In the weston ssh session
killall weston
vi /etc/xdg/weston/weston.ini
# Add to the configuration file for weston.ini [screen-share] command=/usr/bin/weston --backend=rdp-backend.so --rdp-tls-cert=/opt/server.crt --rdp-tls-key=/opt/server.key --socket=wayland-1 --no-config# Run weston export XDG_RUNTIME_DIR=/dev/socket/weston && export WAYLAND_DISPLAY=wayland-1 weston -B drm,rdp --config=/etc/xdg/weston/weston.ini --rdp-tls-cert=/opt/server.crt --rdp-tls-key=/opt/server.key --shell=fullscreen-shell.so --no-clients-resize# In a new terminal, tunnel to the device's RDP server port with a port number of your choosing. # Port 3389 is the RB3 Gen 2's RDP server which will be reached via a localhost port (e.g. port number 5555). ssh -o StrictHostKeychecking=no -o UserKnownHostsFile=/dev/null -L 5555:localhost:3389 -p 2222 root@localhostEdit the
/etc/configs/config-multi-input-output-object-detection.json:// Change from false to true to output to RDP { 'output-display': true, }Run the sample application again.
Start an RDP session to the device through localhost and the chosen port number.