
Compute Session
Compute devices in QDC are accessed through an SSH tunnel with Remote Desktop (RDP) access. This guide walks you through the full connection process — from establishing the tunnel to connecting with your RDP client.
Prerequisites
Before you begin, make sure you have:
- An SSH key imported or generated in QDC. See SSH Keys for setup instructions.
- A running Interactive Session with a Compute device.
- An RDP client installed on your machine (e.g., Microsoft Remote Desktop, built into Windows).
Step 1: Set up SSH tunneling
The SSH tunnel creates a secure connection between your local machine and the remote device. This tunnel must stay running for the entire session.
Open a PowerShell or Terminal window and run the SSH command shown in the Connect dialog.
The command follows this format:
ssh -i {path_to_private_key} -L {ssh_port}:sa{session_id}.sa.svc.cluster.local:22 -L {rdp_port}:localhost:3389 -N sshtunnel@ssh.qdc.qualcomm.com| Value | Description | Where to find it |
|---|---|---|
{path_to_private_key} | Path to your SSH private key file | The file you created/uploaded when setting up SSH keys |
{ssh_port} | Local port for SSH access to the device | Shown in the Connect dialog (default: auto-assigned) |
{rdp_port} | Local port for RDP access to the device | Shown in the Connect dialog (default: auto-assigned) |
{session_id} | Your session execution ID | Shown in the Connect dialog |
Keep this window open
The SSH tunnel must remain active for the duration of your session. Do not close the terminal window running this command.
Step 2: Connect to the device via SSH
Once the tunnel is running, open a new terminal window and SSH into the device:
ssh -i {path_to_private_key} -o StrictHostKeychecking=no -o UserKnownHostsFile=/dev/null -L {rdp_port}:localhost:3389 -p {ssh_port} hcktest@localhostThis gives you a remote shell on the device. You'll use this shell in the next steps.
Step 3: Enable passwordless RDP login
By default, RDP blocks passwordless login. Run the following command in the SSH window from Step 2 to allow it:
reg add HKLM\SYSTEM\CurrentControlSet\Control\Lsa /v LimitBlankPasswordUse /t REG_DWORD /d 0 /fYou should see:
The operation completed successfully.Step 4: Connect with your RDP client
Open your RDP client and enter the following connection details:
| Field | Value |
|---|---|
| Computer | localhost:{rdp_port} |
| User name | Snapdragon\HCKTest |
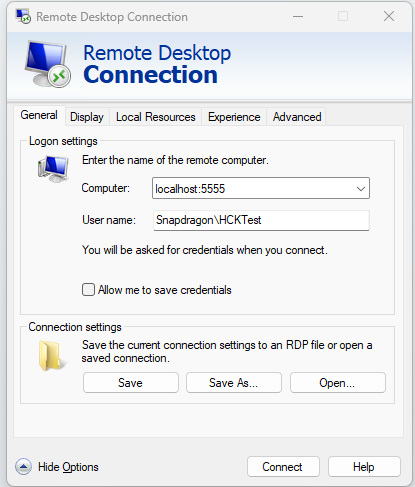
Click Connect. When prompted for a password, leave the password field blank and continue.
Windows users
You can open Remote Desktop Connection by searching for "Remote Desktop Connection" in the Start menu, or by running mstsc from the command line.
Jupyter Notebook (BuildAlong events only)
If your session is a BuildAlong event, you can run a Jupyter notebook server on the remote device.
Start the Jupyter server by running the following command in the SSH window from Step 2:
jupyter notebook --no-browser --port=8901 --NotebookApp.token='' --NotebookApp.password=''Then open your local browser and navigate to:
Troubleshooting
Having trouble connecting? See SSH Troubleshooting for solutions to common issues including host authenticity warnings, permission denied errors, RDP connection failures, and connecting to additional ports.